11 ways to customize your waiting room for a better user experience

Discover 11 customization options you can use to turn your waiting room into a seamless extension of your digital customer experience. Learn how to curate your waiting room to enhance user experience, keep customers informed, and deliver transparent and flexible queuing.
A virtual waiting room is a high-visibility solution. On your biggest days, when you’re at your busiest, it’s the door your customers pass through to access your site.
At Queue-it, we know how critical user experience is to our customers. That’s why we offer an advanced suite of fully customizable waiting room features to match every use case.
You can use these tools to ensure your waiting room engages customers, delivers transparency, keeps them informed, and gives them the flexibility to queue their way.
Over the past 10 years, we’ve created thousands of custom waiting room themes for thousands of customers, from The North Face to the State of New Hampshire to Ticketmaster.
Because you can customize the waiting room with any combination of HTML, CSS, and JavaScript, the options for how you tailor it to your brand and goals are virtually limitless. And with a white label waiting room, you can create a waiting experience that's indistinguishable from your primary website or app.
Here’s 11 ways you can customize your waiting room experience to ensure you deliver the best possible experience for your customers.
Table of contents
- Match the look & feel of your website
- Tailor your progress bar
- Choose your own URL & favicon
- Embed media
- Customize your wait information
- Choose from 50+ languages
- Give real-time updates
- Let visitors queue on the go & get notified when it's their turn
- Add an email form
- Answer common questions
- Customize the full queuing process
We’ll start this list off with the simple ways you can visually customize your waiting room to ensure a consistent, branded experience for visitors.
When designing your waiting room, you can bring your own:
- Background image or animation
- Fonts
- Logo
- Brand colors
- Tone of voice
- Audio & sound effects
With these customization options, you can create a waiting room that’s essentially indistinguishable from your main website. Or you can get creative and make your waiting room an experience unlike anything else on your site.
Perhaps the most prominent and commonly used customization option is the waiting room background.
Your queue page background can be a static image or video that matches the colors, imagery, and branding of your website.
If you’re queuing customers for a particular event, such as a product drop or concert ticket sale, you can assure customers they’re in the right place with photography or animations that match the event-type.
RELATED: Custom Waiting Room Gallery: Explore 30+ Waiting Room Examples
"We personalized the queue with our imagery, our fonts, our logo, everything. And we could write our own message at the top that was personal, friendly and informative. That personalization was a big benefit. The fact that the customers could enter the queue and immediately recognize it as our site."
JODIE BRATCHELL, ECOMMERCE & DIGITAL PLATFORMS ADMINISTRATOR
Most Queue-it customers know the background of the waiting room is customizable. But did you know you can tailor the progress bar, too?
The default progress bar is our beloved Q-man taking a stroll. But we’ve had custom progress bars with dogs walking, planes flying, drinks filling up, footballs being kicked, clocks ticking, and much more.
Queue-it's default & beloved Q-man.
A Q-dog the team created for one Queue-it customer.
From the plane progress bar, to the clever idea of customers looking out a plane window, to the animated clouds passing by—Peach Aviation's custom theme is one of the most creative we've seen.
“We value our brand image a lot, so it’s important that we keep our cute and happy image at every touchpoint with the customers. So we really liked that the waiting room page was customizable.”
ATSUMI MURAKAMI, CHIEF OF INNOVATION
To assure your customers they’re in the right place, you can choose your own favicon and URL for your waiting room.
Favicon is short for favorite icon. It’s the small, branded icon that appears at the top of your browser when you visit a website.

By adding your own favicon, you can create a consistent online experience and make it easy for customers to navigate back to your waiting room while browsing the web in another tab.
The default URL for your waiting room is “company.queue-it.net” (with “company” being your company name or domain), but with a white label waiting room you can choose your own URL that masks the fact that your visitors have left your website.
You could, for example, have “company.queue.com”, “queue.company.com”, or “lounge.company.com”. You simply must own the main domain “company.com”, then you can add whatever you’d like to it.
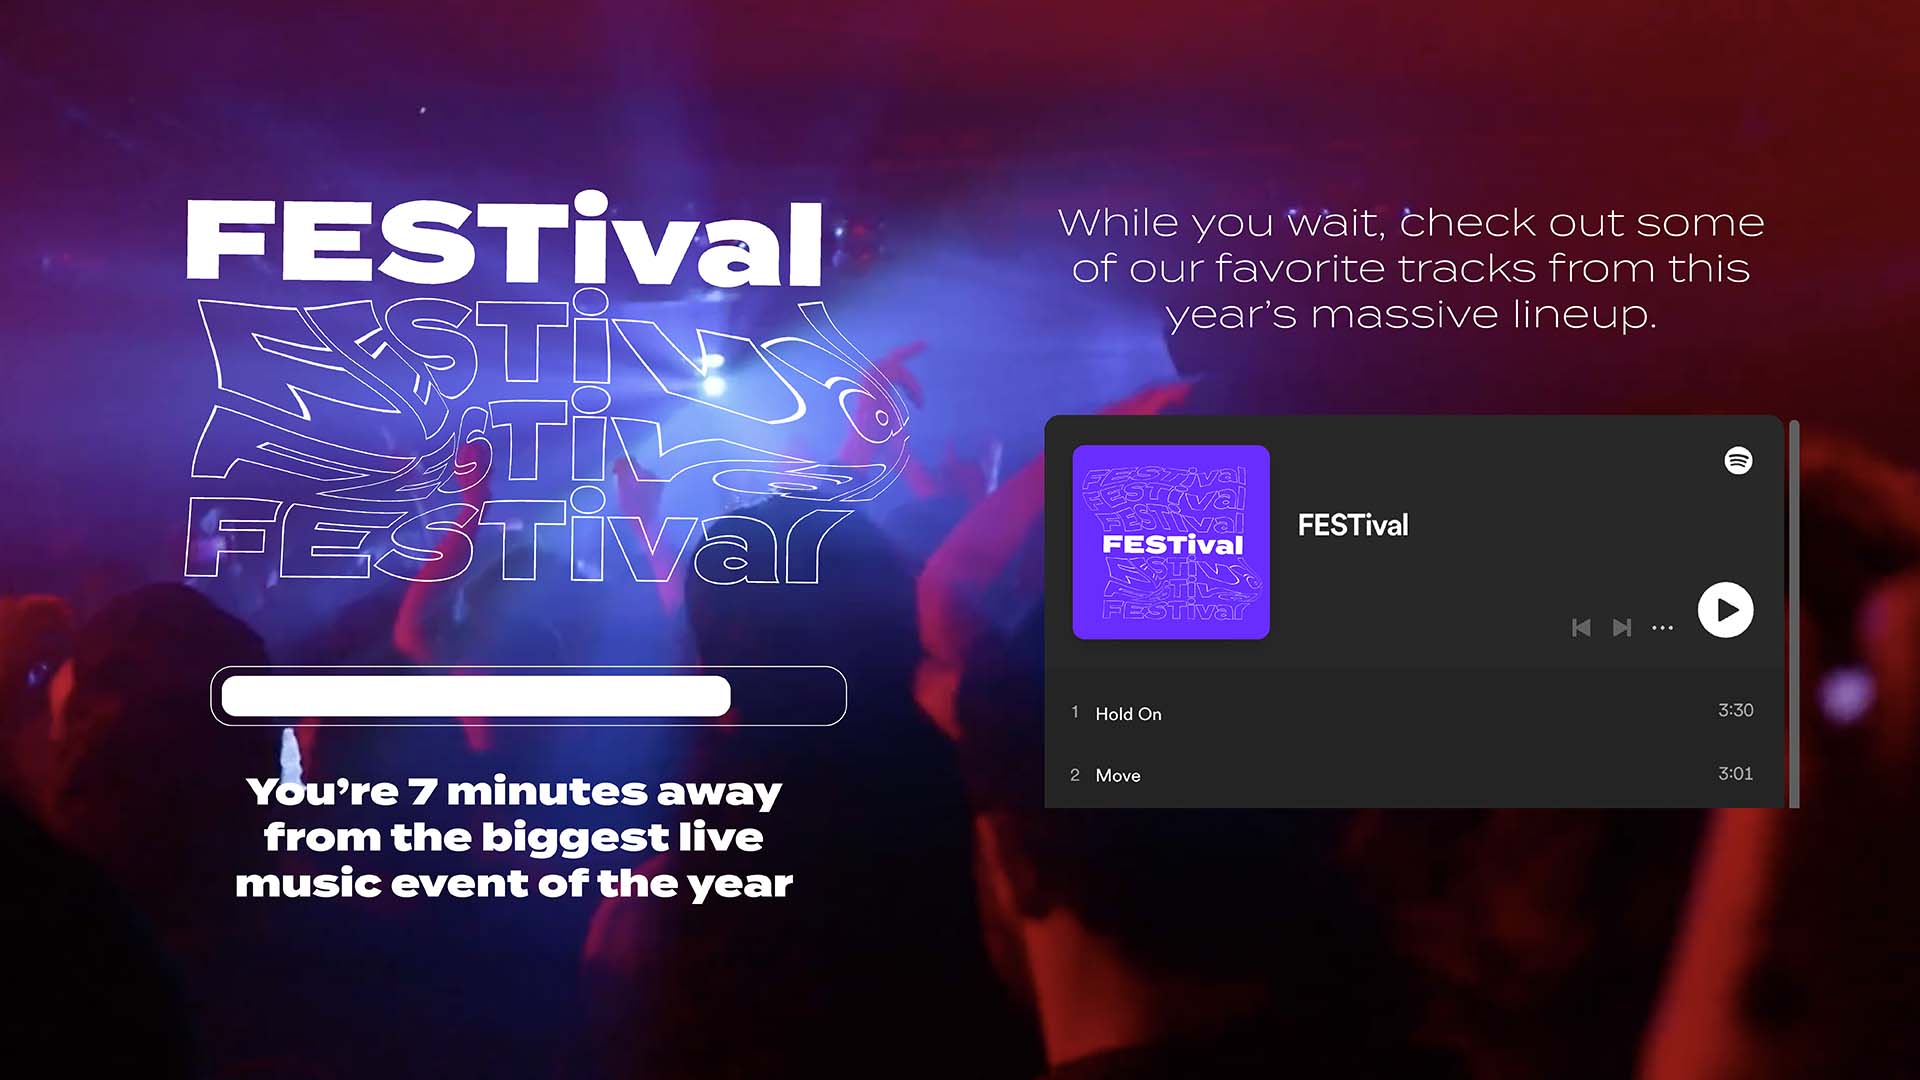
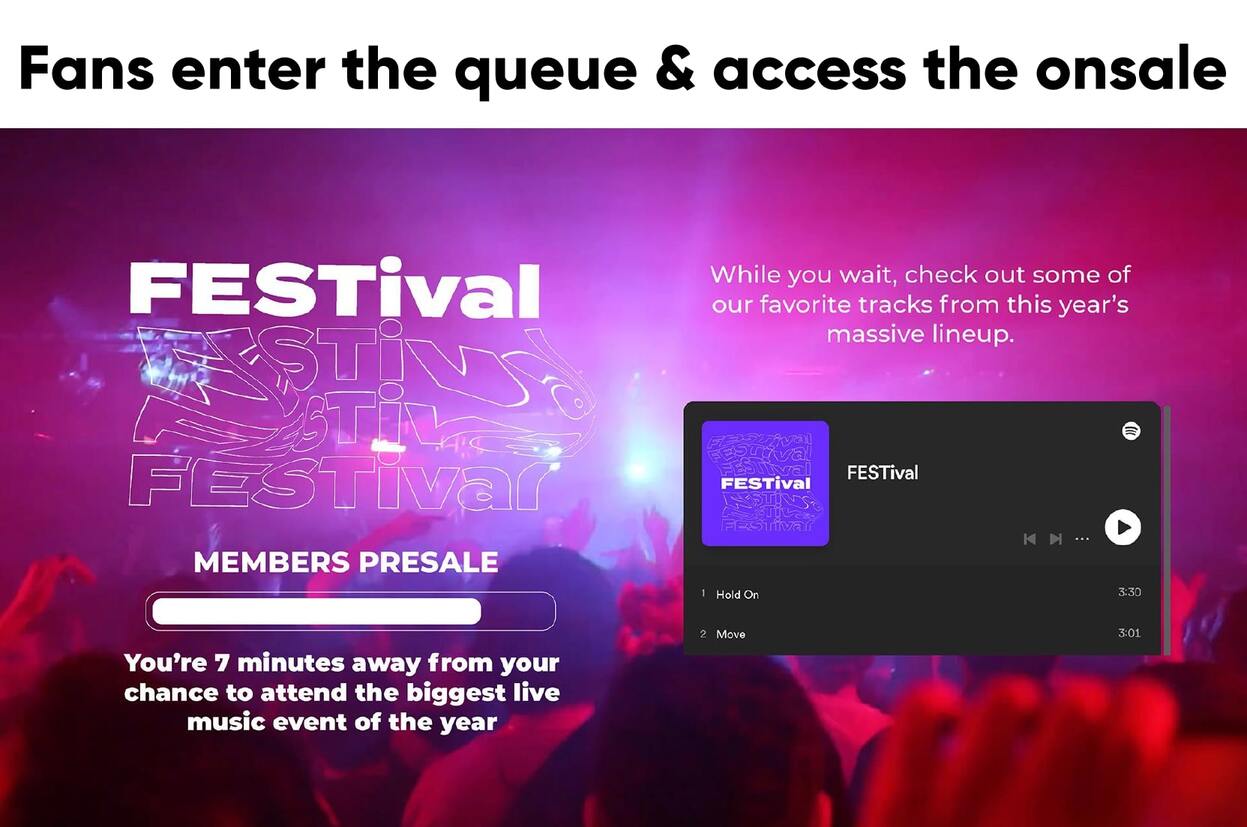
The real creativity and strategy of waiting room design comes from customers who embed media on their custom theme.
Because you can customize the waiting room with any combination of HTML, CSS, and JavaScript, the options for how you tailor it to your brand and goals are virtually limitless.
Embedded media isn’t just a chance to keep customers engaged while they wait, you can also use it to drive social media engagement, boost loyalty program signups, and collect first-party data.
Here’s a few pieces of content that we often see included on our customers’ waiting rooms:
- YouTube videos
- Spotify playlists
- Image galleries
- Customer quizzes
- Social media feeds
- Product info (FAQs, size guides, images)
- Lookbooks & other products
RELATED: Your Digital Billboard: 12 Ways To Use Your Waiting Room as a Marketing Asset
For this next section, we’ll move from the purely visual aspects of queue page customization to the usability, accessibility, and information you give visitors.
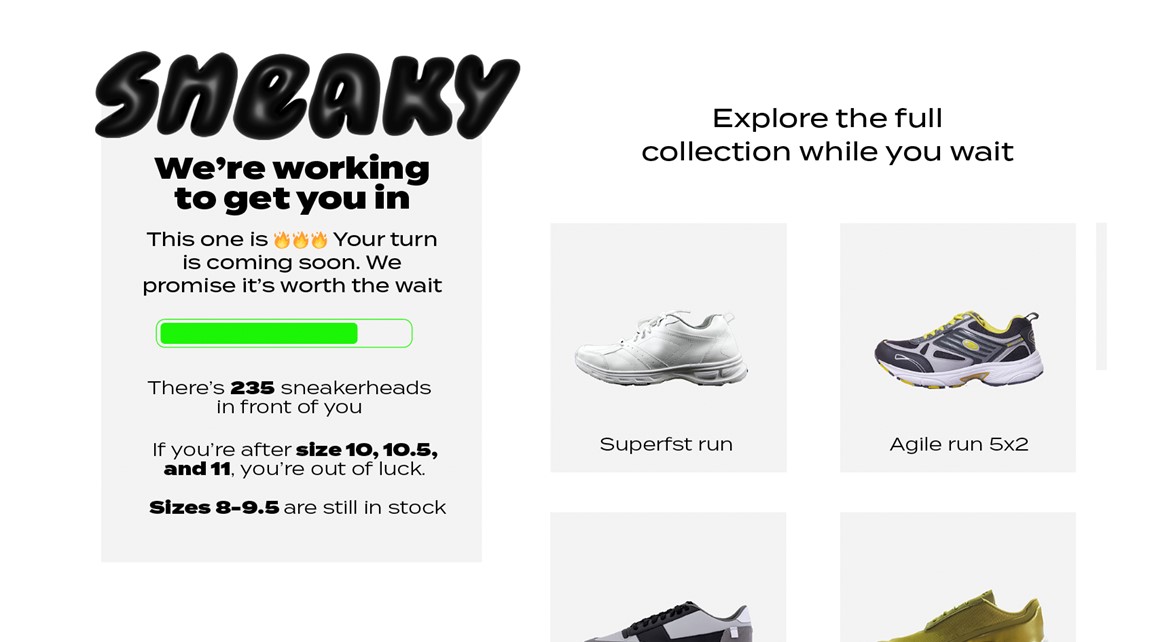
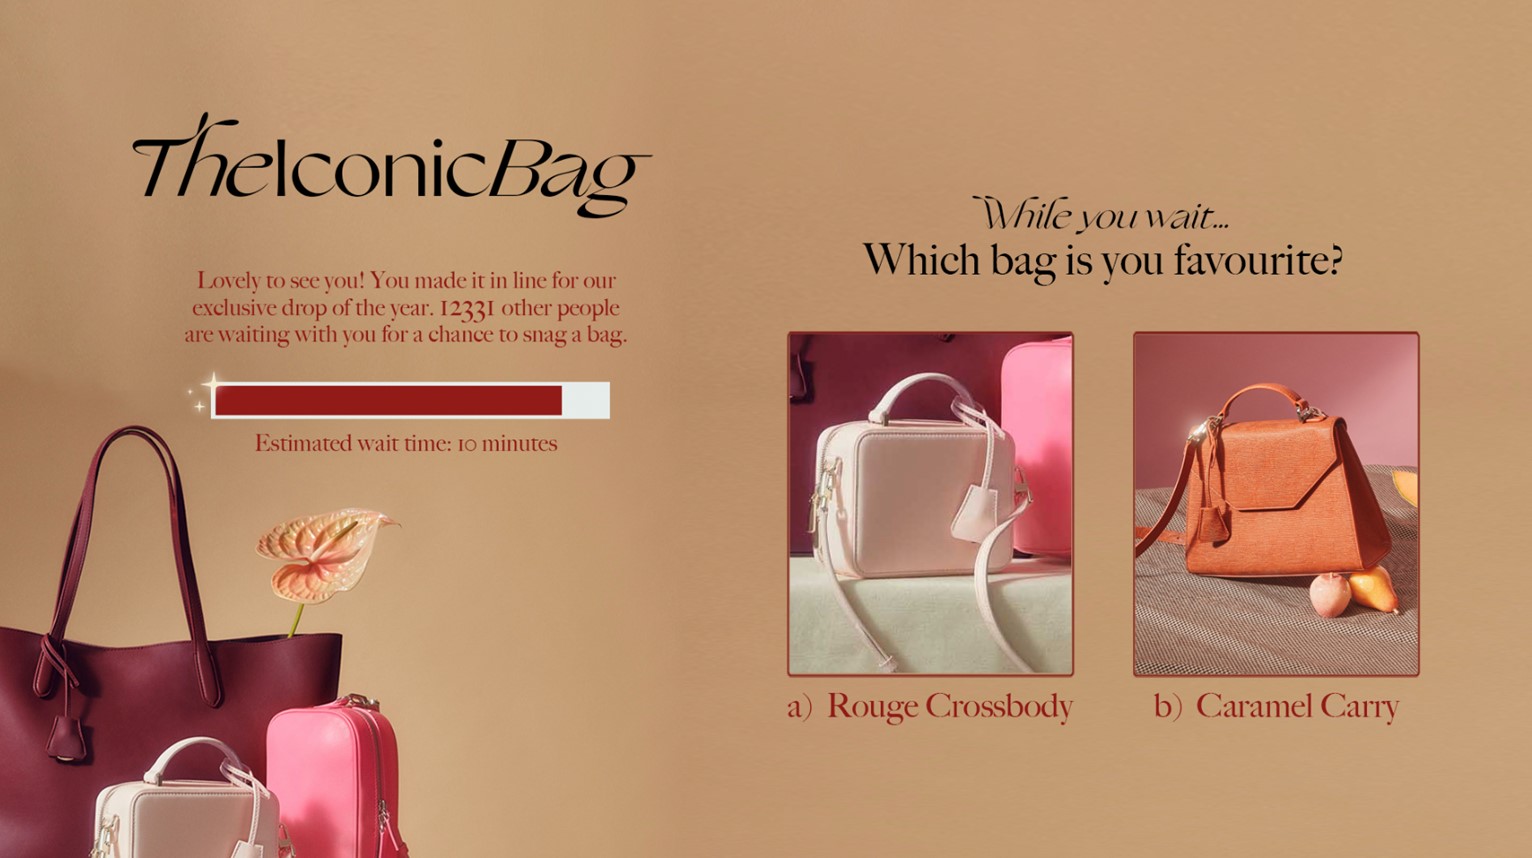
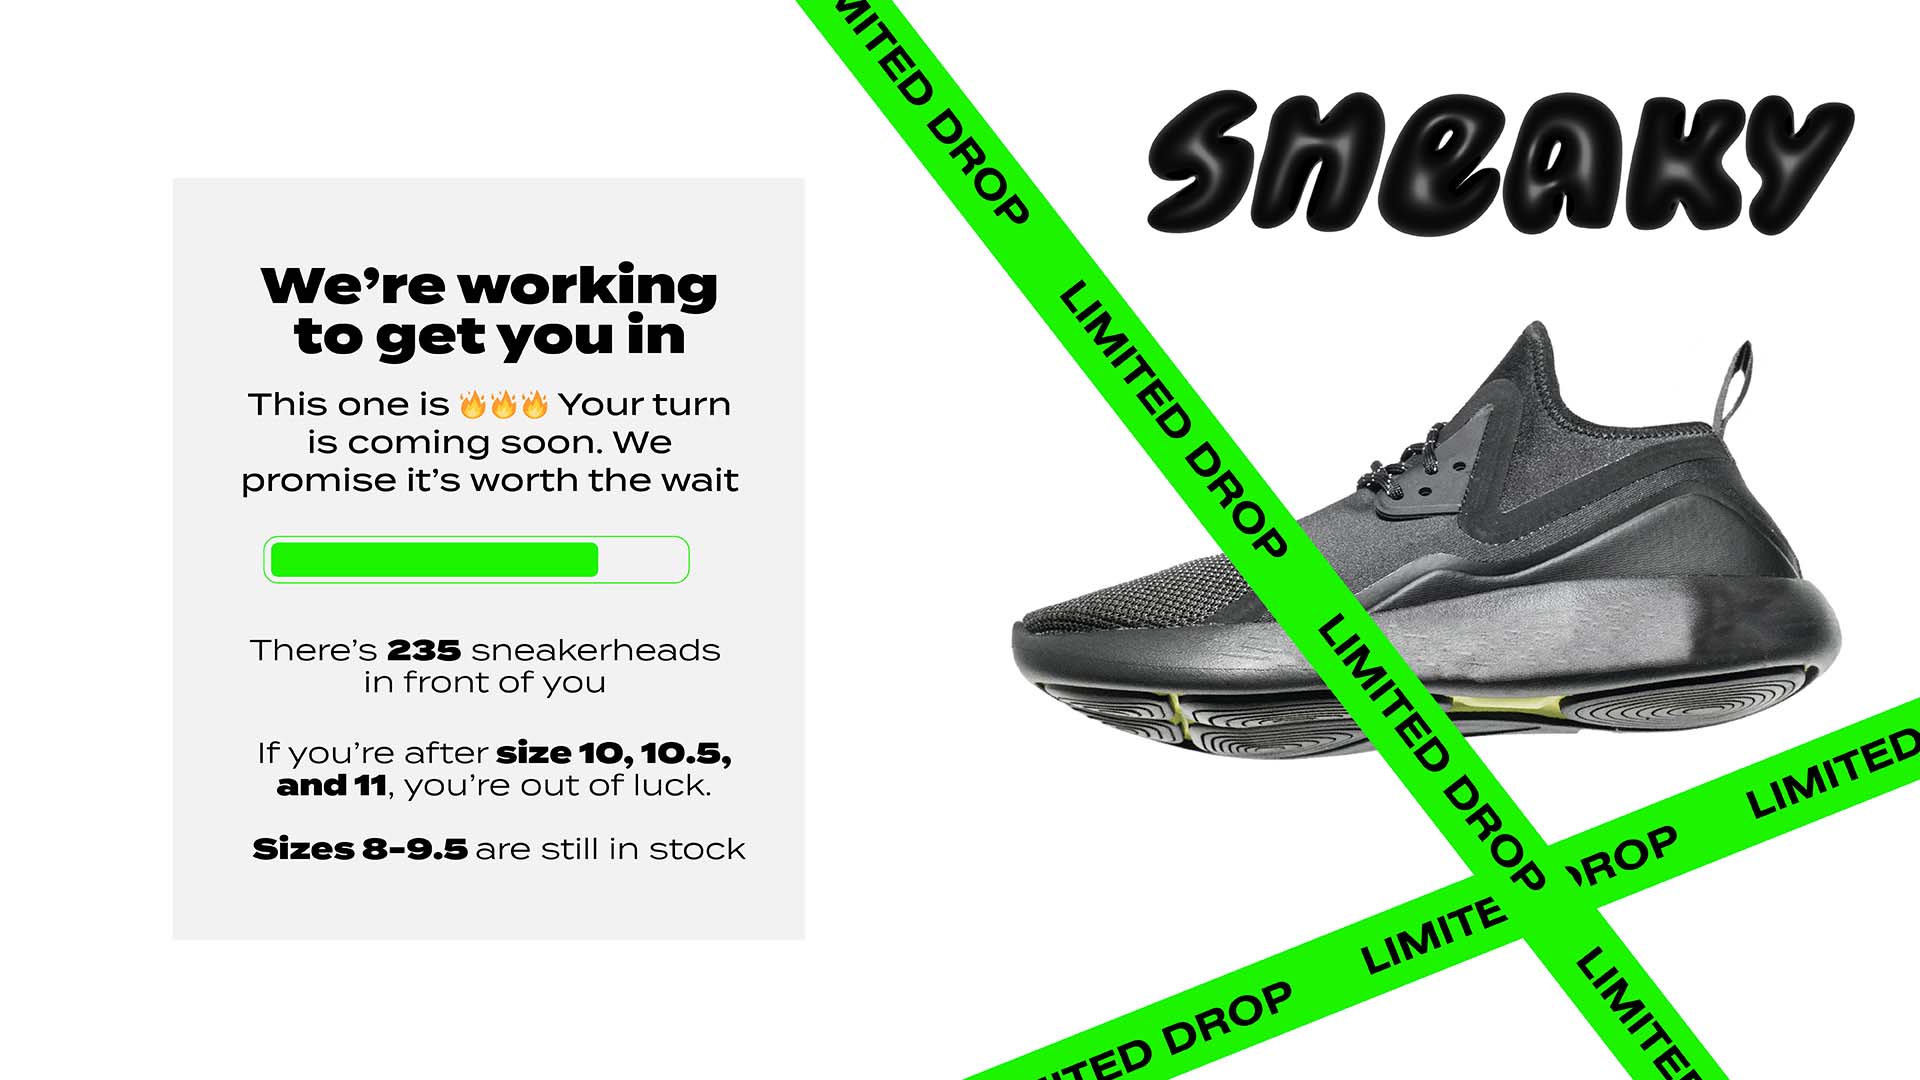
Showing progress and setting expectations are essential elements of a good queuing experience—both on and offline. That’s why we designed Queue-it’s waiting room to provide detailed, real-time wait information to visitors, including:
- Number of visitors ahead of you in queue
- Estimated wait time
- Estimated time of arrival on website
- Progress bar with percentage progress made
- Status last updated
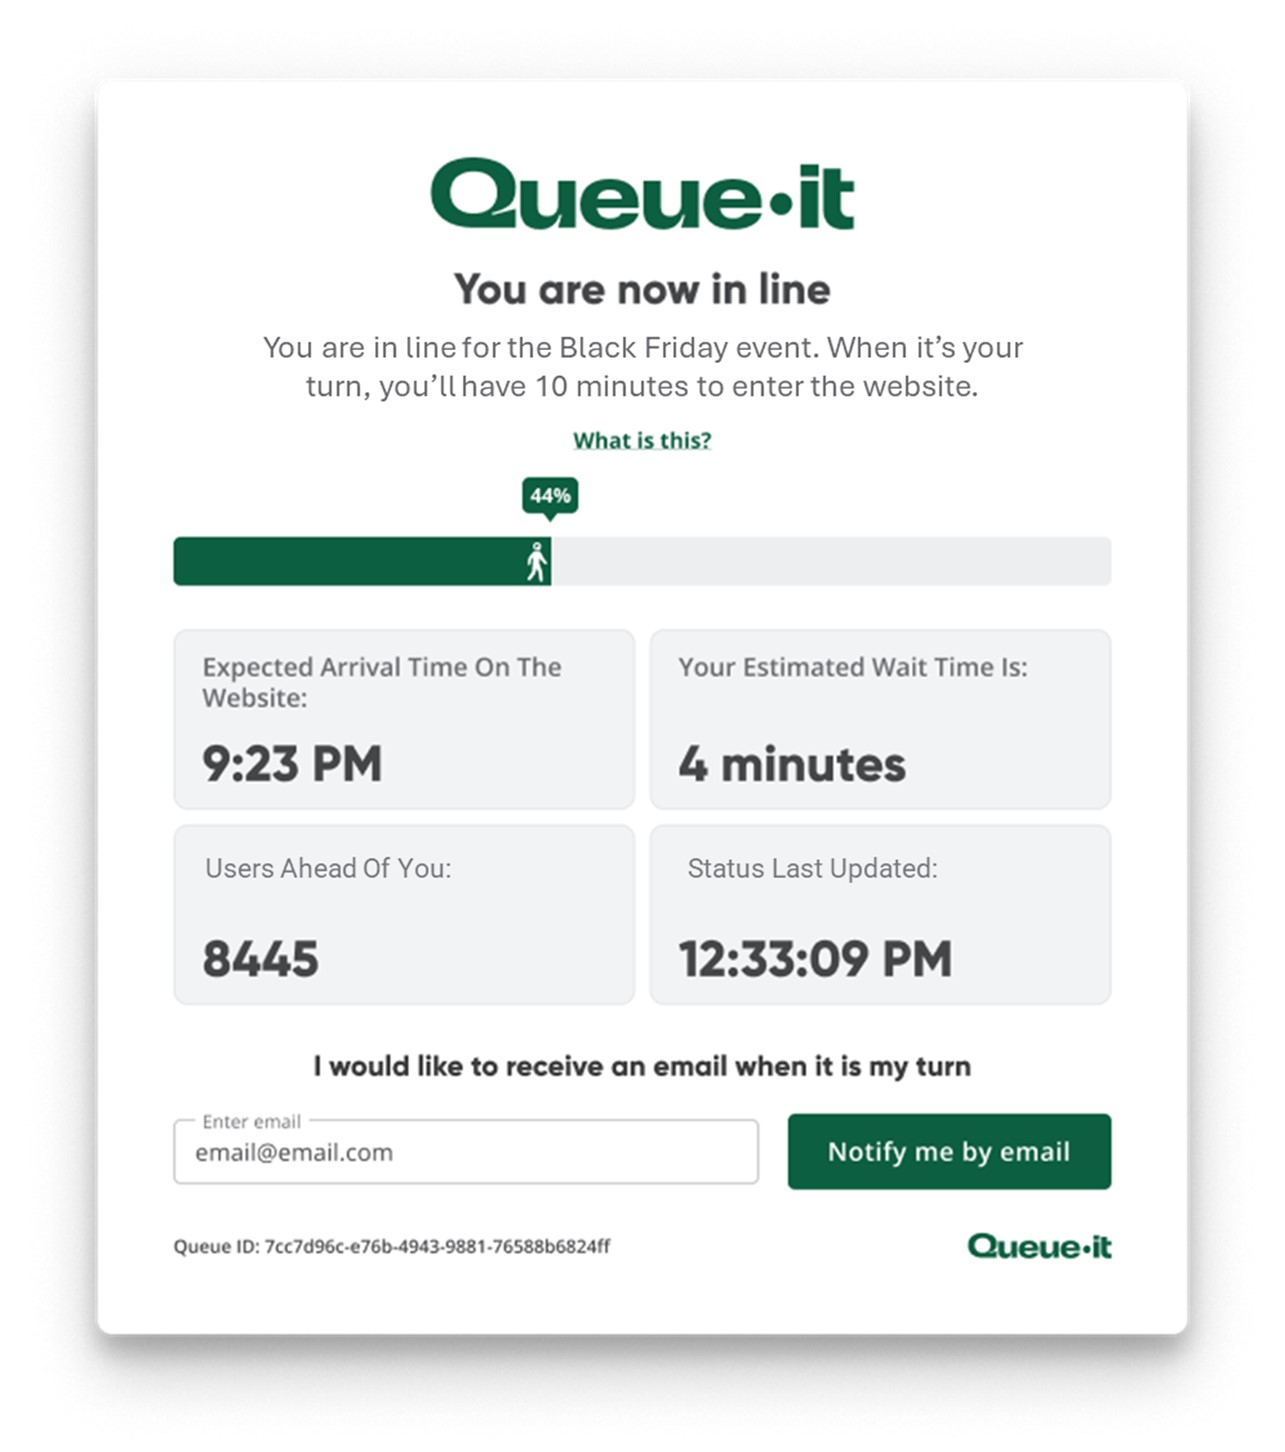
Queue-it's default refined theme displaying progress percentage, estimated arrival time, estimated wait time, users ahead of you in queue, and status last updated.
When you create your waiting room, you can include all these pieces of wait information. But you can also pick and choose what you want to show site visitors and customize how you display this info depending on your user research and preferences.
Queue psychology research shows that giving certainty around waits makes the wait time feel shorter, and that anxiety makes the wait time feel longer. That’s why we always recommend being transparent and giving as much information as possible.
Many Queue-it customers find that features like “users ahead of you” provides valuable social proof that shows how in-demand their products are and leads to increased conversions.
Some other customers, though, believe high queue numbers could dissuade users from waiting. One such customer configured their “users ahead of you” display to max out at 2,000, so that any visitors beyond that point simply see “Users ahead of you: 2,000+”.
We recommend including comprehensive wait information. But what metrics you choose to show your customers is entirely up to you. You can curate it to match your objectives, use case, customer personas, and more.
Some companies who prefer the minimalist approach choose to only include a progress bar. Others who want to set clear expectations include the progress bar along with estimated arrival time. Others opt for the estimated wait time instead of the estimated arrival time. There are dozens of different ways you can choose to display your wait info and keep your customers informed.
“It shows where they are in the queue and the remaining wait time, which gives them comfort compared to no communication. We also matched the design to the brand’s tone, so they don’t feel like they’re sent to another website.”
JUNJI HAYASHI, CEO, MAXIM CO.
People from over 172 countries have joined queues operated by Queue-it. We serve customers across the globe, and our waiting room reflects that.
When you set up a Queue-it waiting room, you can choose to display your text in over 50 languages. You can check out Queue-it's supported languages here.
You can also set up your waiting room to adjust language based on visitors’ browser settings, so you’re automatically speaking to customers in their preferred language. If the visitor uses a browser language Queue-it doesn’t offer, the waiting room will display in the default language.
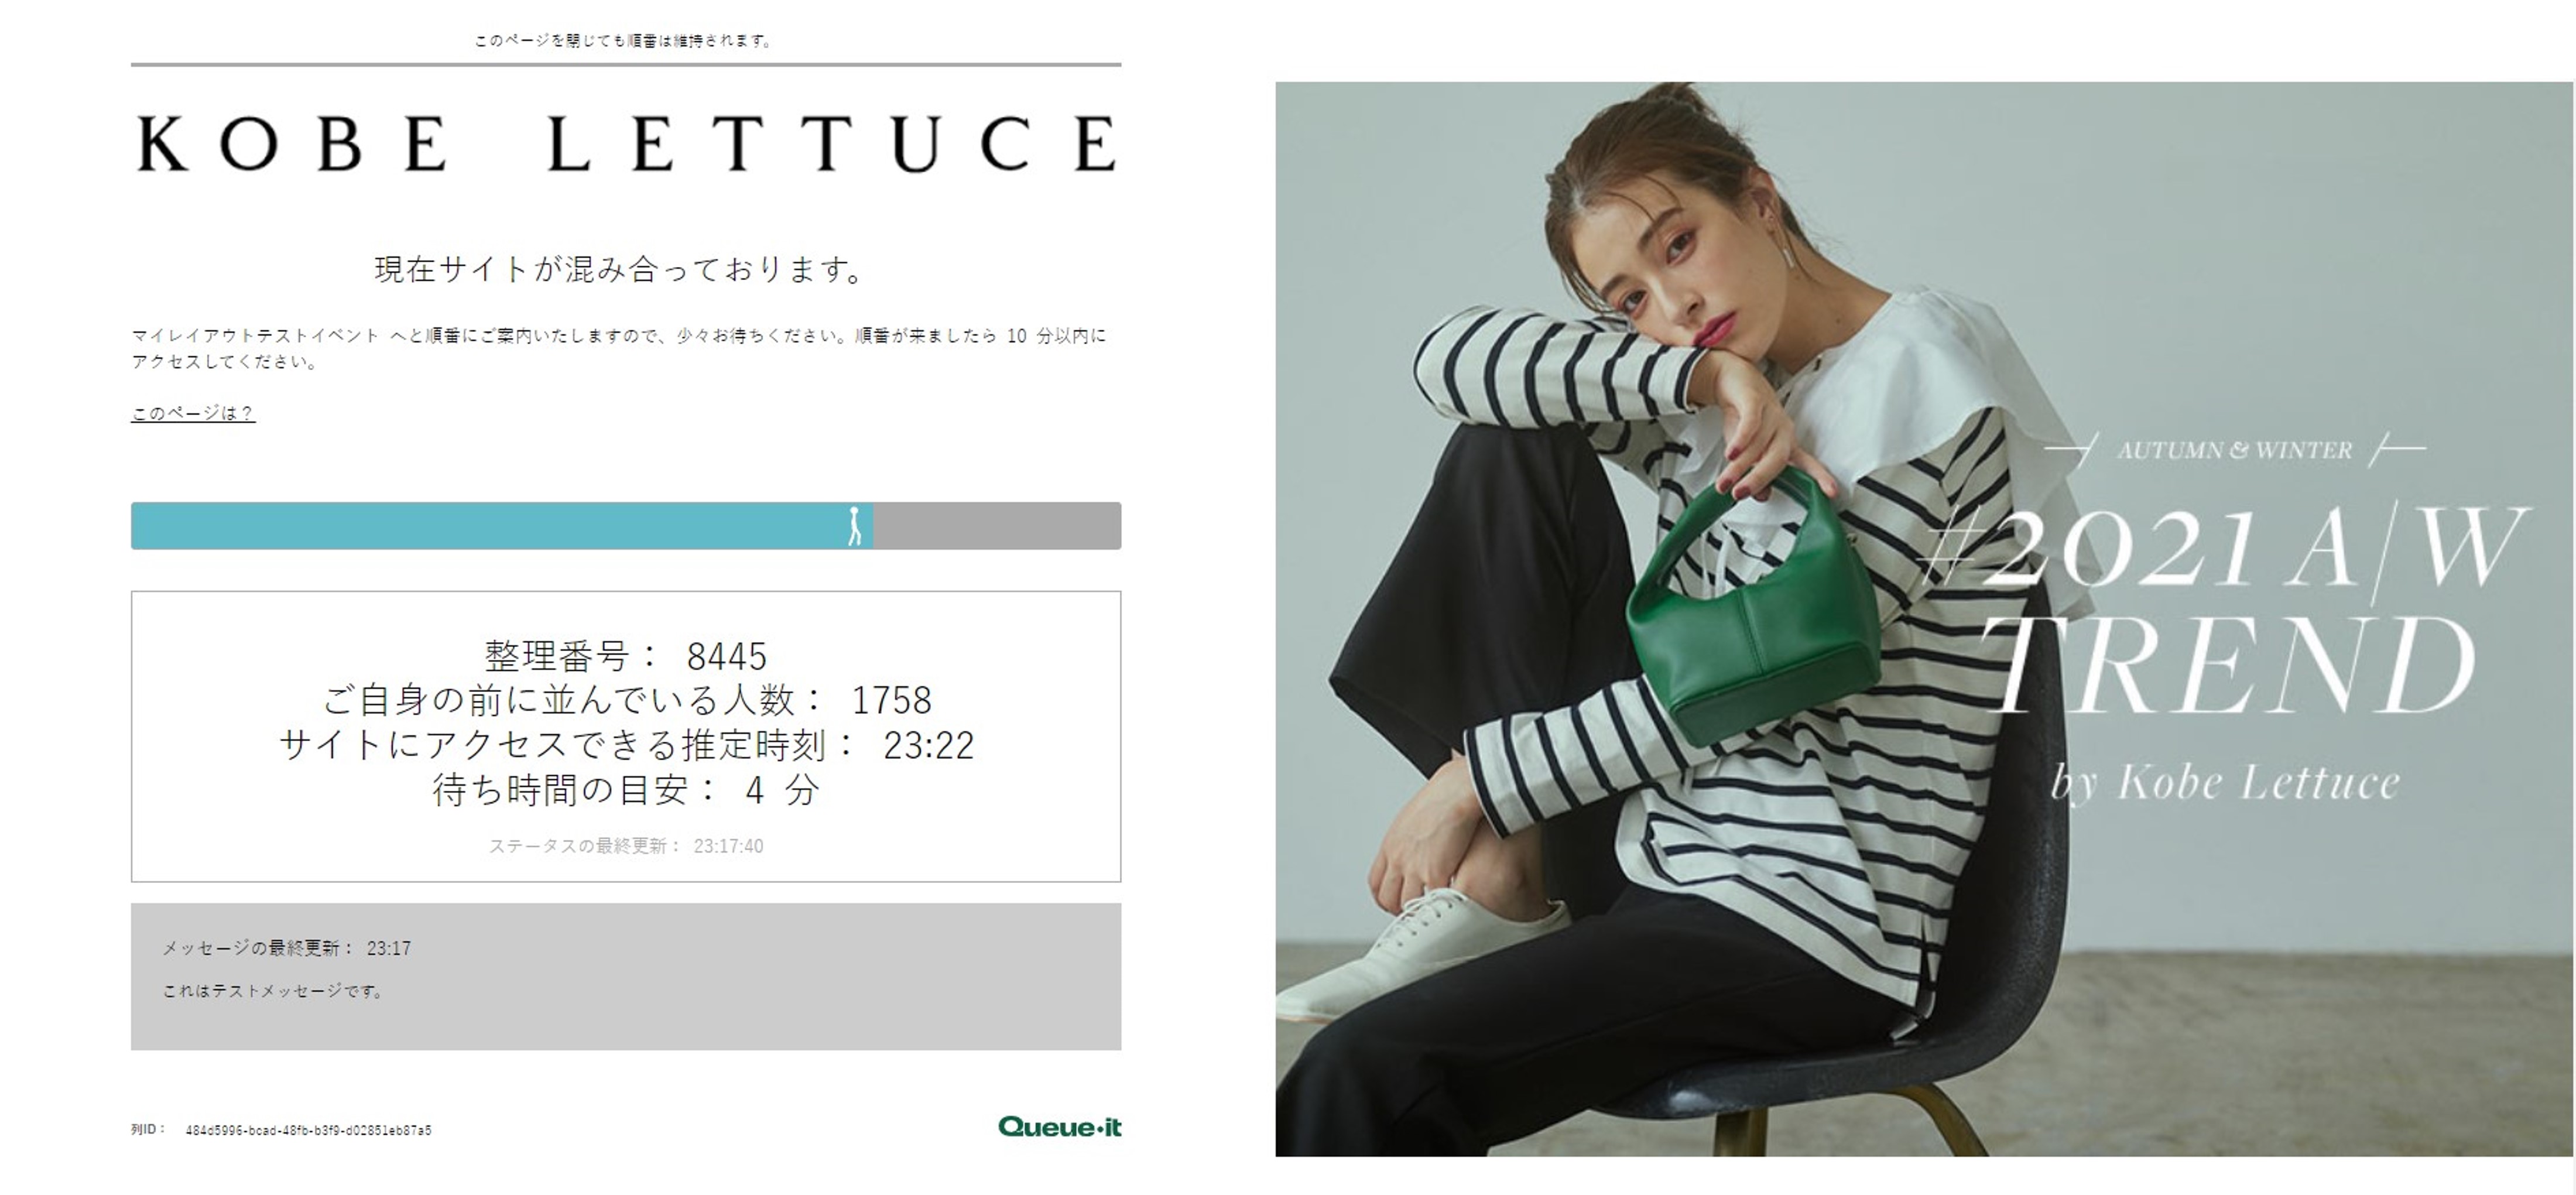
Kobe Lettuce's custom theme in Japanese.
If you want to go beyond the standard information Queue-it offers, you can use the communication pane feature to share real-time messages with everyone in your waiting room.
With the communication pane, you can:
- Send live inventory updates
- Give information to help customers prep
- Thank customers for their patience
- Explain why you’ve paused or stopped the queue
Sneaker site custom theme with real-time communication about inventory availability.
"The biggest benefit is driving the user experience. It’s an amazing tool for driving and connecting to people … It opens a communication channel with the customer through the communication pane and the waiting room page itself … This is really amazing for the business, because we can be creative and also communicate better with customers."
ALEXANDRE BRANQUART, CIO/CTO
Queue-it’s email notification feature is a favorite among our customers (and their customers). It allows visitors to enter their email address and get a notification when they’ve reached the front of the queue.
This feature allows site visitors to hold their position in line without needing to stay glued to their computer screen. Plus, customers can open the queue link that’s sent in the email on both desktop and mobile devices, meaning those who start queuing on their computer can leave the house and pick up their spot in line on their phone.
“One of the features that we really like is the ability to get the email when you get towards the front of the queue. We see a lot of people using that because of course it means that if you see there's a 45 minute wait, you just pop your email in the form and 10 minutes before it's your turn, you get that notification.”
JON HAWORTH, SR. COMMERCIAL SYSTEMS MANAGER

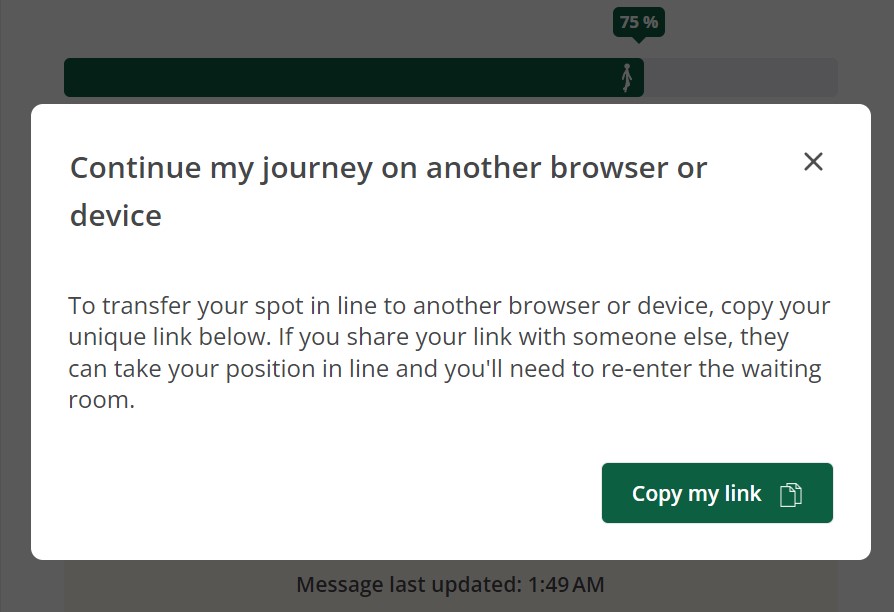
Transferring a queue position from desktop to mobile (or vice versa) can also be done without the email notification feature. Customers can simply click their Queue ID to get a link they can copy and send to another device. They can follow this the link and continue queuing on the new device as though nothing has changed.
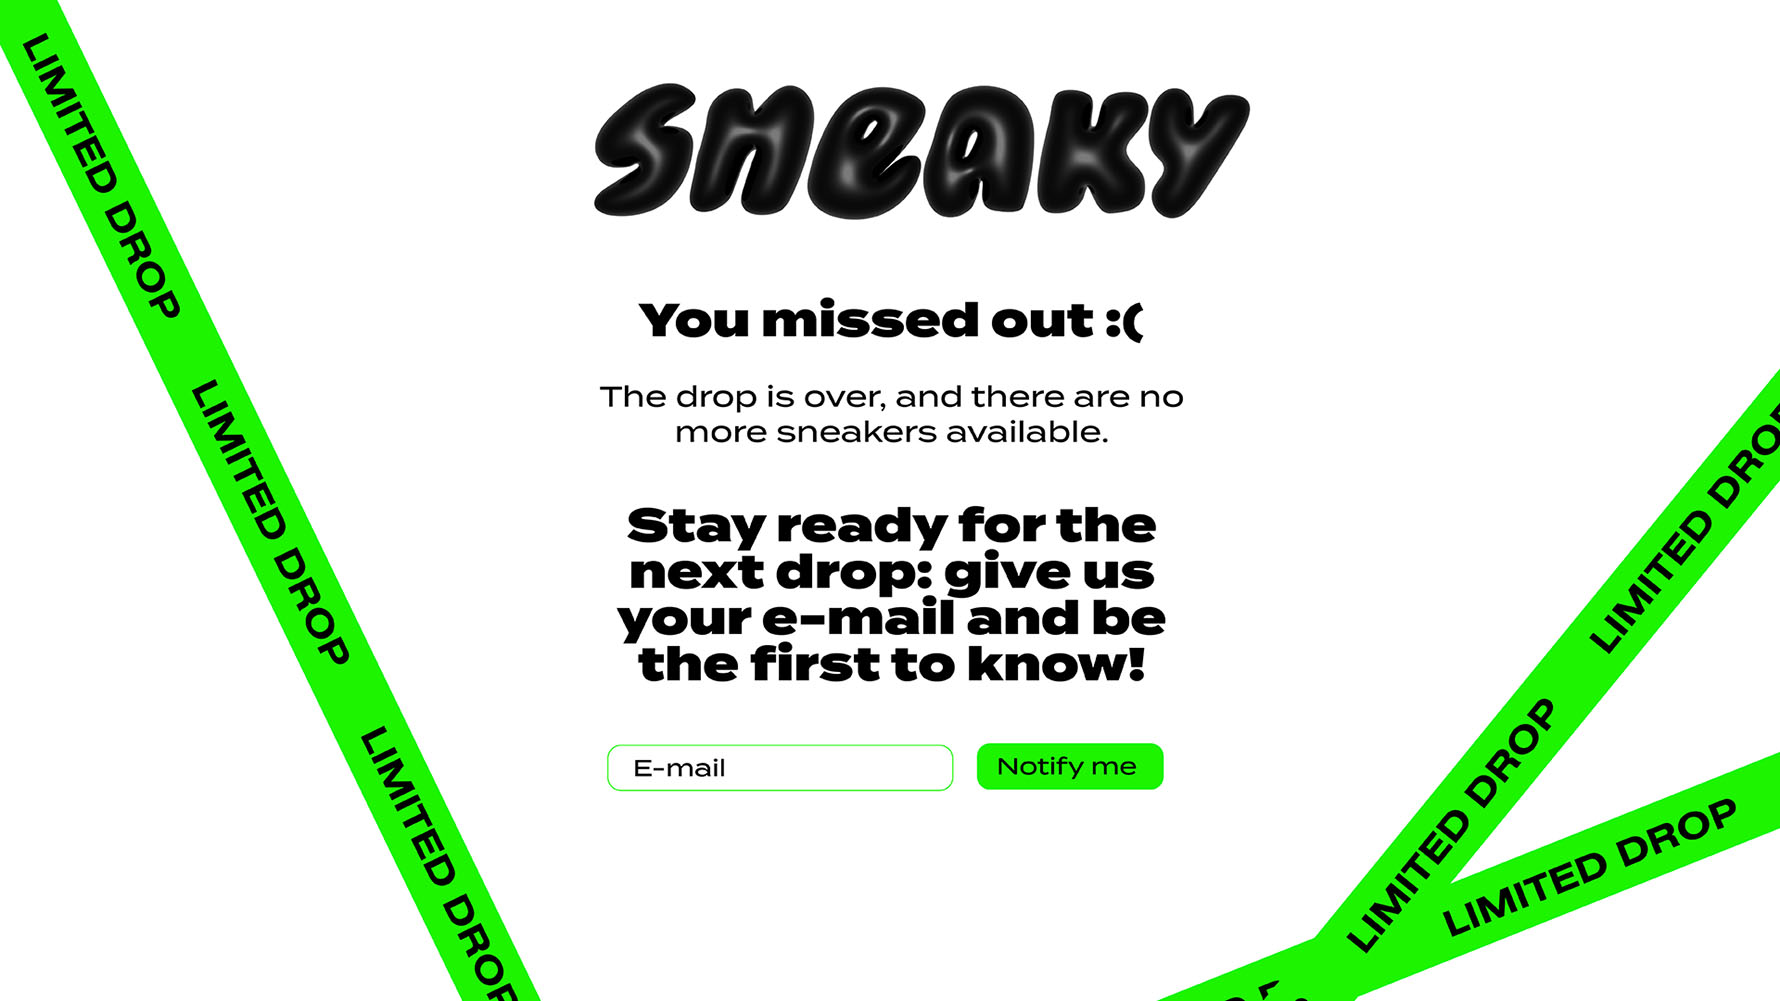
Your waiting room is typically active when demand for your products is at its peak. By adding a loyalty program or newsletter sign-up form to your queue page, you can use that demand to capture first-party data and boost marketing channels.
You can add an email form to any custom queue page, but many Queue-it customers such as The North Face and SharkNinja take this one step further using the invite-only waiting room.
With an invite-only waiting room, the email form on your queue page can act as a “queue fast pass” that gives customers who sign up immediate access to a separate, gated queue exclusively for members.
RELATED: Control Sales Access & Grow Your Customer Base with The Invite-only Waiting Room
One enterprise retailer we work with added 50,000 membership sign-ups across two drops using this technique. Another increased their membership base by 40% across four drops.
Before Bedre Nætter’s Black Week sales went live, they protected their whole site with Queue-it’s waiting room. Bedre Nætter explained on the waiting room that customers who joined their VIP program could get site access four hours earlier than the general public.
A full 25% of people who visited this page gave their email in exchange for early access to the sale.
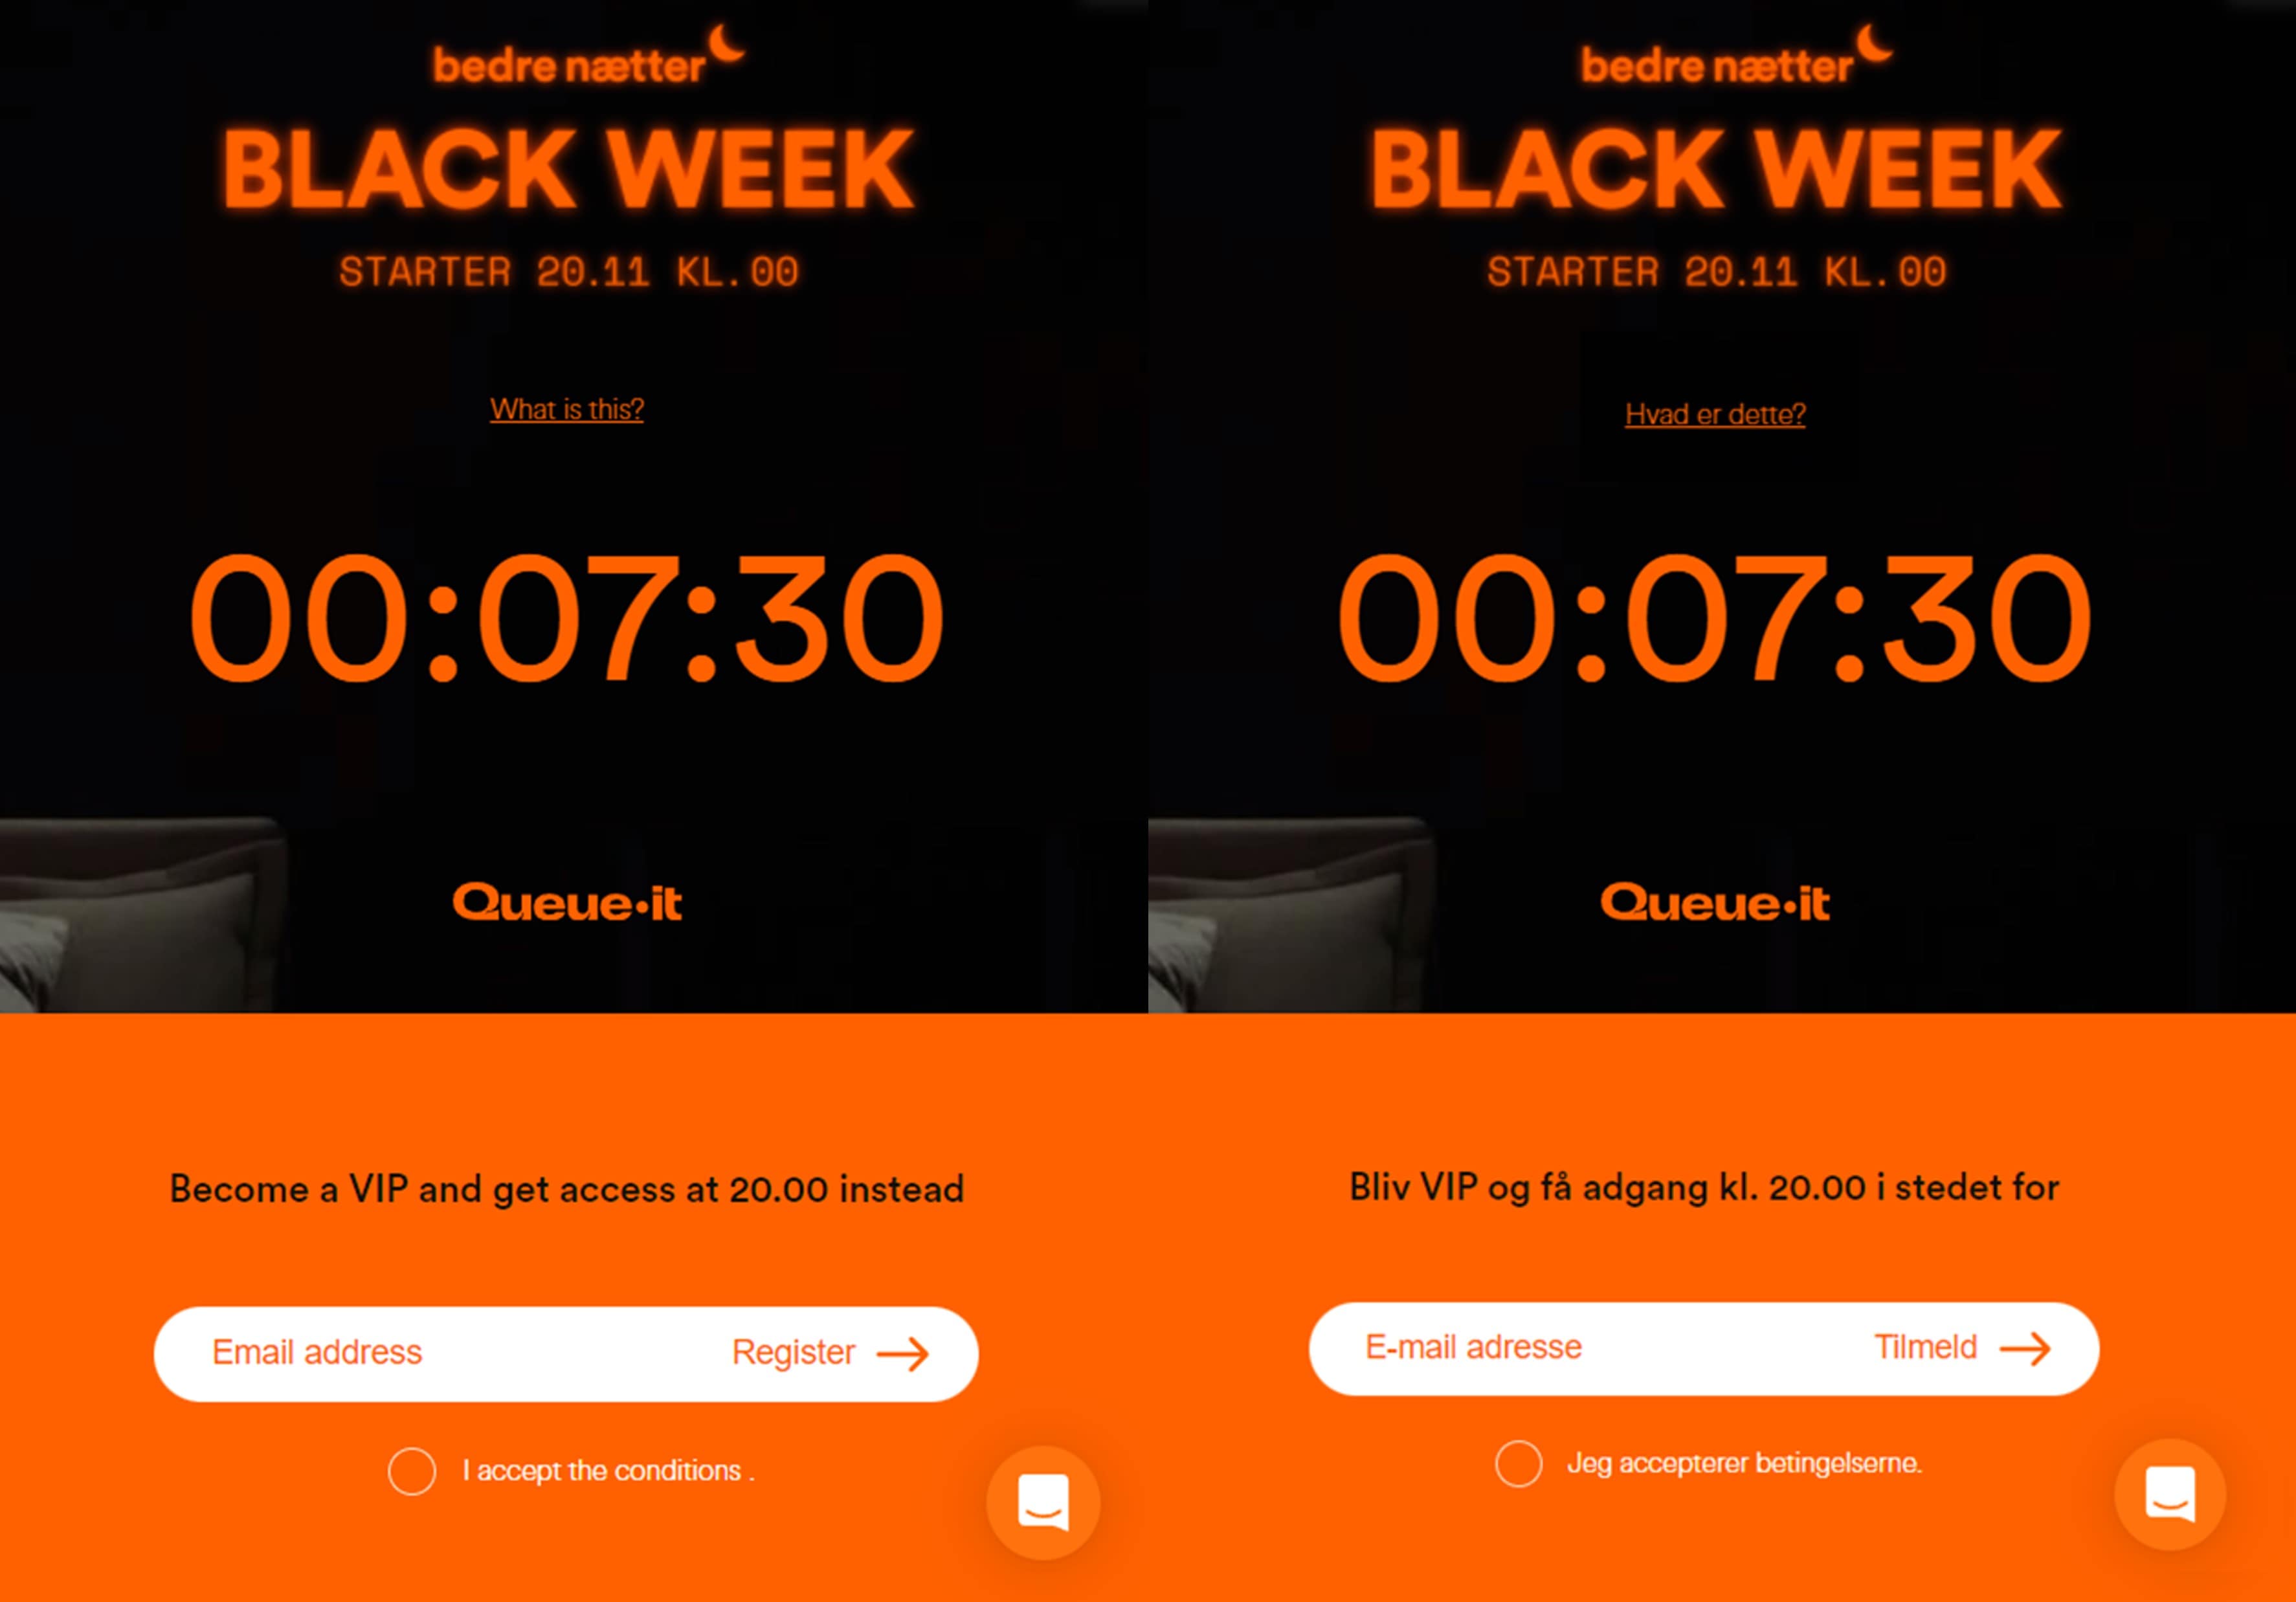
Bedre Nætter's pre-queue countdown timer with sign-up form for early access. In translated English (left) and original Danish (right).
Protecting the entire site gave the Bedre Nætter team “the time we needed to make all the changes for the sale and encouraged more people to sign-up for our VIP program. The sign-up form on the queue page alone drove another 2,500 sign-ups,” says Marcus Forsberg, Head of Ecommerce & Performance.
“The VIP sale was a great success. The site stayed online, we hit our targets. And with invite-only, we delivered on the exclusive access we’d promised our VIPs.”
MARCUS FORSBERG, HEAD OF ECOMMERCE & PERFORMANCE

The visitors in your waiting room are there because they want to get access to your site, sale, or registration. So why not let them make the most of their wait by giving them all the information they’ll need when they get through to the site?
Many companies use their waiting rooms to ensure their customers are prepared when they get through to the site. They achieve this with:
- Frequently asked questions & their answers
- Sale or event terms & conditions
- Information on what visitors will need (i.e. important documents for a public sector registration, login details and credit card for a sale)
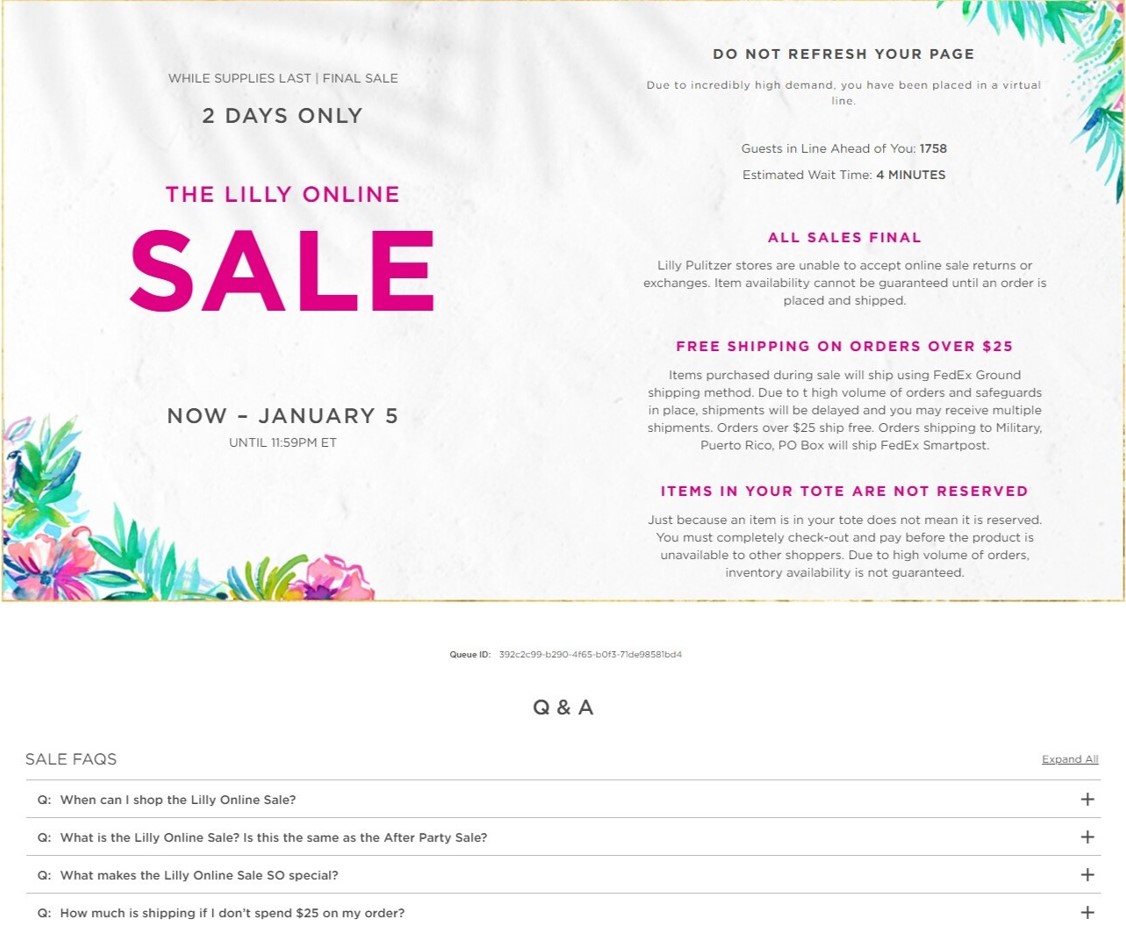
Lilly Pulitzer's custom theme with detailed sales info & collapsible frequently asked questions section.
“The waiting room is quite a nice customer experience, because people know what’s happening and what to expect next. It also gives us an opportunity to talk to and prepare the customer. We did some user research to determine what to include on the page, so people are ready when they get to the front of the queue—things like make sure you have your photos and get your old passport ready.”
ELAINE SALVETA, DIGITAL SERVICES MANAGER
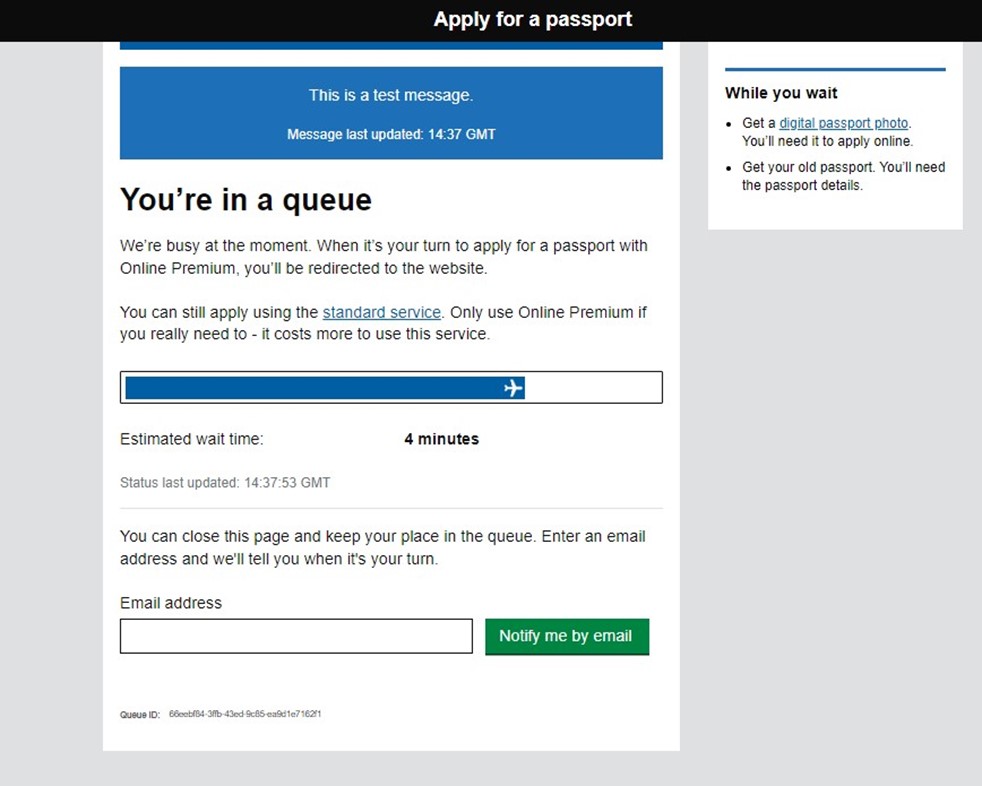
Home Office's custom theme with "while you wait" information & links to key resources.
Virtual waiting rooms are used across a wide range of industries and use cases, which is why Queue-it offers three distinct queuing strategies. Two of these three queuing options include adding additional queue pages (or queue phases) to the user flow that you can customize just like your main waiting room.
When you’re setting up a waiting room, you can choose from three key queuing strategies:
- The insurance play: Which lets you guard against traffic spikes 24/7 and only activate the queue when traffic reaches the threshold you’ve set.
- The timed release play: Which lets you protect scheduled sales or registrations by gathering all early visitors on a countdown page that protects your site and builds hype.
- The exclusivity play: Which lets you choose which customers can enter your sale by verifying their identity before they can access the queue.
With the insurance play, you’ll only display a single waiting room to customers, like the ones we’ve shown above. This will automatically activate when traffic hits a certain threshold, then automatically deactivate when traffic levels return to normal.

But the timed release and the exclusivity play introduce new queue phases, which allow for further customization.
A timed release has three key queue phases:
- Pre-queue: Early visitors are gathered on a page with a countdown timer. When the timer hits zero, they're randomized like a raffle and flowed to the queue.
- Queue (standard waiting room): Visitors get their position in line and receive detailed wait information. They're then flowed to your site at the rate you choose in fair first-in, first-out order.
- Post-queue: Visitors still in the queue when the sale or registration is over can be flowed to a post-queue, where you can direct them to your mailing list or other promotions.
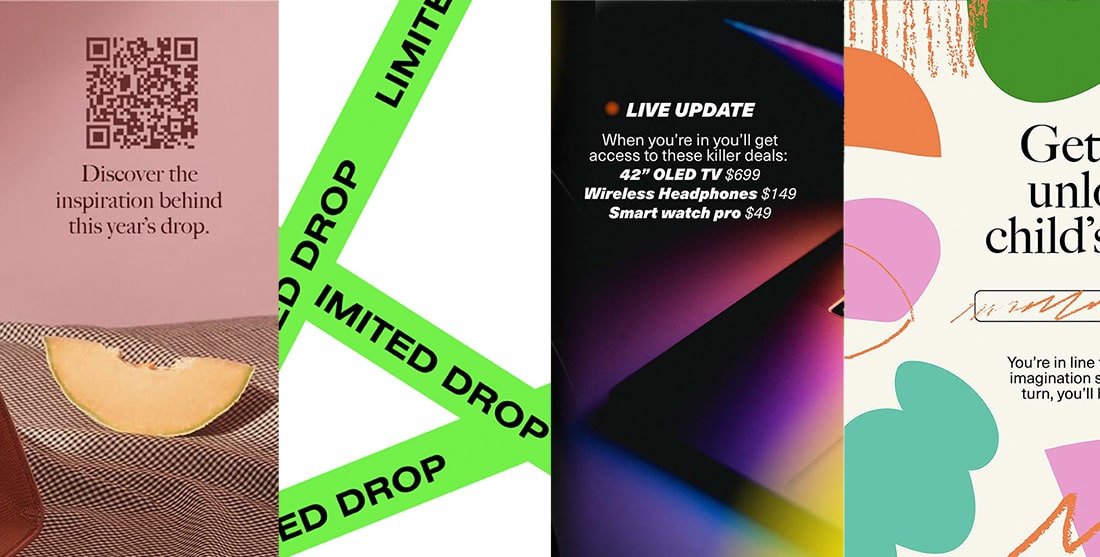
The carousel below shows these three queue phases in action. Each one can be customized just like your main waiting room in all the ways we’ve covered above.

You can also customize these pages further based on when visitors will see them. For example, you can tailor the pre-queue page to build hype and use the post-queue page to give visitors who missed out a call to action—such as “signup for the waitlist”, “subscribe to our newsletter”, or “check out these other products you might like”.
The exclusivity play, or invite-only queue, also introduces new queue pages that customers see before the pre-queue. These pages are where customers verify they’ve been invited to the sale or registration in order to get access to the queue. As with every other queue page, these are fully customizable.


“Our members expect to get the benefits they pay for. Queue-it helped us deliver the exclusive drop access members were promised and gave us the peace of mind the website would be there for them.”
TRISTAN WATSON, ENGINEERING MANAGER
You can learn more about these three queuing strategies in our blog The Comprehensive Guide to Virtual Waiting Rooms: All Your Questions Answered.
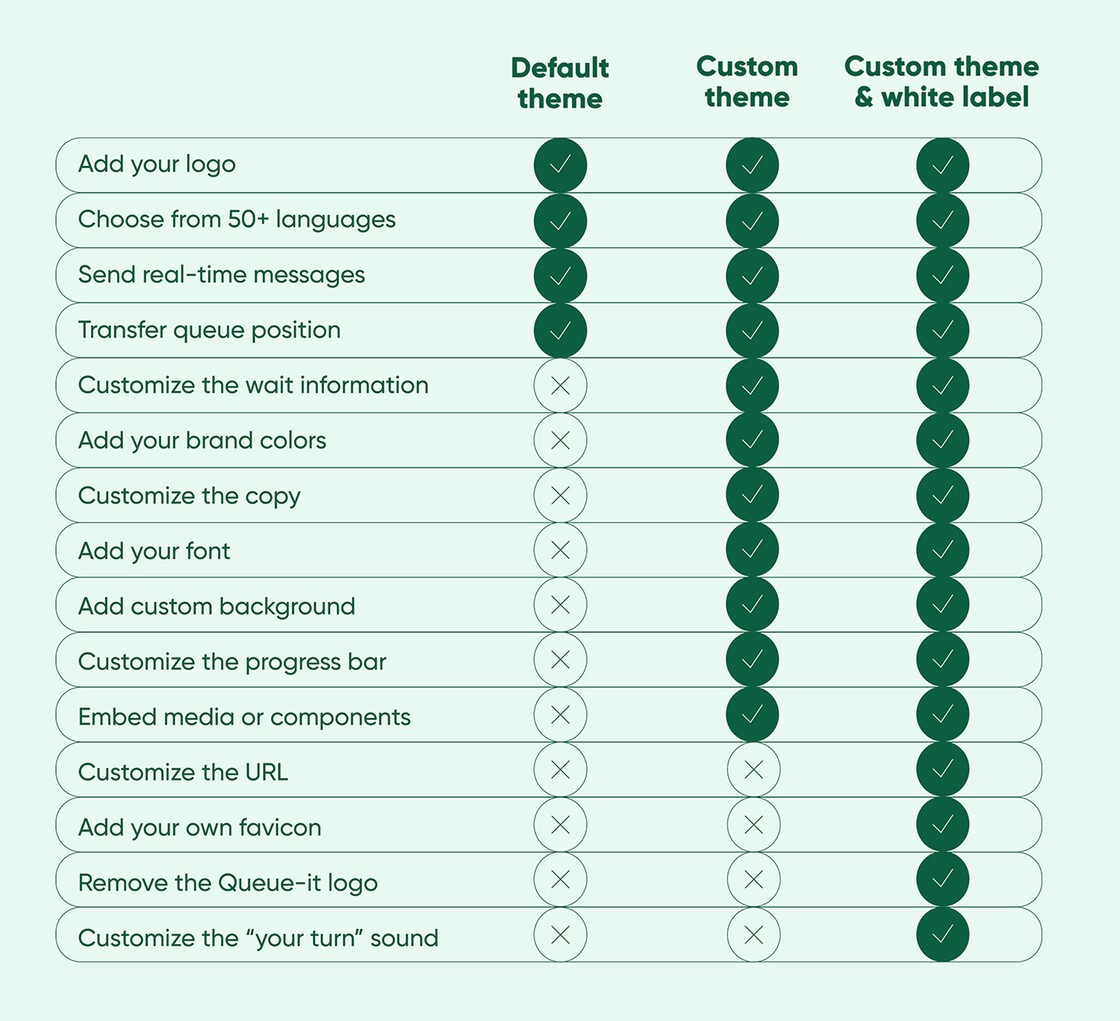
By now you should have a good overview of the many ways you can customize your waiting room to engage visitors, match the look and feel of your brand, deliver fairness, keep people informed, and much more.
Several of these customization options are available to every Queue-it customer. For others, you'll need "custom theme" and/or "white label" features as part of your subscription.
Use the chart below to help decide whether you need a default theme, a custom theme, a white label theme, or a combination of the two:
To learn more about Queue-it custom themes and what you can do with your waiting room, check out:
- The full custom waiting room gallery
- 12 ways to use your waiting room as a marketing asset
- Custom themes for developers
- Or book your product demo & request a custom mock-up