3 useful tips for automated UI testing with Selenium & xUnit
We used Selenium, xUnit, and .NET (C#) when setting up our automated UI test suite for the first time. I’d like to highlight 3 useful lessons we’ve learned at Queue-it that could help you implement your automated UI testing. My suggestions are broadly scoped and could easily be relevant for other tool and framework setups as well.
Our story begins a few years ago when we decided that having automated UI tests would be beneficial. Why? Well, we do not have the manpower to manually test every release. Even if we did, manual testing is time-consuming. A test automation approach lets the machines do all the trivial work so we can concentrate our efforts on more relevant and exciting projects.
We didn’t have much experience with existing UI testing frameworks, but I had worked a little with Selenium in a Java set-up. I found it worked well for that project. And Selenium also supported .NET. So we decided to give it a go.
Fast forward to today, and I can now share 3 helpful tips to help guide you if you are setting up an automated UI test suite for the very first time:
(Note that these descriptions contain code examples in C#, so a basic knowledge of object-oriented programming would be optimal to understand this).
1. Organize
A software test suite is a complex structure on its own – in our case, a .NET solution in Visual Studio. A solution needs good organization and structure to be maintainable and readable.
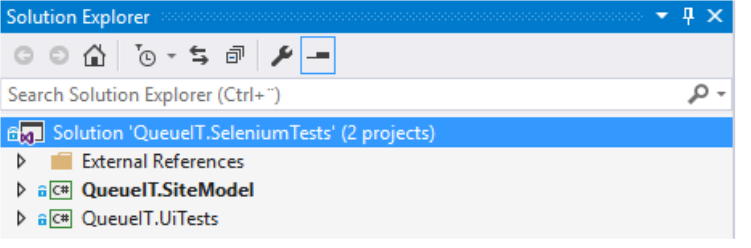
We had an external expert join us to set up the initial solution structure. First we created a model project containing pages and interaction with Selenium components. Then we made another test project using the classes from the model project and with no knowledge of Selenium. Here’s a solution file in Visual Studio:
With this setup, you could replace the underlining UI test framework (Selenium) if needed with another UI framework without changing any of the tests. In addition, the tests read just like any other unit test, clearly visualizing their intent. Here’s a xUnit test example for creating a new layout:
        public void CustomLayouts_ListPage_Add()
        {
            // Arrange
            var expectedLayoutName = "NewCustomLayout" + DateTime.UtcNow.Ticks;

            // Act
            var listPage = new SelfService_CustomLayoutListPage();
            listPage.Goto();
            listPage.AssertIsAt();
            listPage.AddLayout(expectedLayoutName);

            // Assert
            var detailsPage = GetDetailsPage();
            detailsPage.AssertIsAt();
            Assert.That(detailsPage.BasicSettingsTab.Name, Is.EqualTo(expectedLayoutName));
        }
The above test is pretty self-explanatory. When reading it, you don’t know if it’s testing a website, a Windows application, or even a mobile app. And why should you bother? The technicalities are abstracted away so you can focus on writing the actual test.
Key Takeaways:
- Use expert knowledge to get you started
- Ensure solid solution structure with separation of concerns
2. Stabilize
We started writing our tests so that they read as any other unit tests. However, remember that when working with UI, timing is important. Here are some differences between UI tests and other tests:
- If you go to a page and then click a button before the page has completed loading, you get an exception
- If you click a tab control which shows a section (which was hidden before) and then afterwards click some element in this section before it’s actually visible, you get an exception
- If you go to a page which afterwards loads data via a separate AJAX call, you first see an empty page and then you assert that there should be data, and you get an exception (assertion should be after the data load)
To get around these problems, we added many wait/polling mechanisms. We do not want to get an exception if something is missing – we just try again. At some point, we do a timeout concluding that this will never happen, i.e. the test is actually broken.
Selenium has its WebDriverWait offering which can handle some of these situations. Below you see it encapsulated in a “in queue page”, waiting a maximum five minutes for a positive result from a JavaScript function:
inqueuePage.WaitUntil(
                () =>
                {
                    Thread.Sleep(1000);

                    var result = inqueuePage.JavaScriptExecutor
                        .ExecuteScript("return GetQueueIdWhenRedirectedToTarget()");

                    return result != null;
                },
                TimeSpan.FromMinutes(5)
            );
Another example, with use of Polly, is when we want to assert that a redirection happens at some point in time using a Polly policy to handle retries for specific exception types:
var retryPageLoad = Policy
                .Handle<AssertIsAtException>()
                .WaitAndRetry(10, (retryCount) => TimeSpan.FromSeconds(retryCount));

            var inQueuePageAfter = new QueueFront_InQueuePage(
                TestAccount.QueueitSelenium.CustomerId,
                createdEvent.EventId,
                createdEvent.QueueUrl);

            retryPageLoad.Execute(() =>
            {
                inQueuePageAfter.Goto();
                inQueuePageAfter.AssertIsRedirected(createdEvent.RedirectUrl, TimeSpan.FromSeconds(5));
            });
All our pages have a base class where we assert some general expectations like “Has the page loaded completely?” or “Have all AJAX calls finished?”. These mandatory expectations should always be met before continuing with anything else.
Key Takeaway:
- Design for failure using wait/polling mechanisms
3. Scope
When writing a test, you normally scope it. For example, let’s say you want to test creating some entity in one test and deleting that entity type in another. You could have one test with both. But when it fails, it’s not clear if it was the deletion or the creation that was the root problem until you investigate it.
Writing a delete test without something to delete will not work. You could say the test has a precondition that is not met. Normally you can mock this out. For example, you could fake that there is data, but the UI tests run against a “real” test or production environment with “real” data, likely in a database somewhere.
Our solution to this problem was using our own Queue-it API. This exposed creation of entities, so preconditions could be met. But it also helped scope the tests. Let me explain with the following xUnit test for deleting a layout:
        public void CustomLayouts_ListPage_Delete()
        {
            // Arrange
            var layout = TryCreateLayoutViaApi();

            // Act
            var listPage = new SelfService_CustomLayoutListPage();
            listPage.Goto();
            listPage.AssertIsAt();
            listPage.DeleteLayout(layout.DisplayName);
            listPage.AcceptDelete();

            // Assert
            listPage.IsAtSaveSuccess();
            var layoutListItem = listPage.Layouts.FirstOrDefault(l => l.Name == layout.DisplayName);
            Assert.That(layoutListItem, Is.Null);

            listPage.Goto();
            listPage.AssertIsAt();
            layoutListItem = listPage.Layouts.FirstOrDefault(l => l.Name == layout.DisplayName);
            Assert.That(layoutListItem, Is.Null);
        }
In the Arrange section, you see the layout is being created, i.e. the precondition is met. The test can then continue using the actual UI to delete the layout, finishing off asserting that it’s actually gone. A benefit to this is the UI test is only testing the UI and only for the deleted part (not created), so the test is nicely scoped.
Another thing to notice here is the name TryCreateLayoutViaApi. Inside this function, we try to create the layout calling a RESTful method on some web server. That call could potentially fail. So we design for this, doing a reasonable amount of retries before failing the test completely. The goal here is to make your test as robust as possible.
The API can also be used for post conditions, ensuring that test entities are removed for the database in a clean-up or dispose call.
Key Takeaways:
- Scope your tests, focusing on different UI functionalities in each test
- Use an API to meet test pre- and post- conditions
To sum up
Overall, having an automated UI test suite is an excellent idea. It saves a significant amount of time compared to a manual testing method and it also helps to find bugs before a release, which makes it an essential QA tool.
Make sure that your tests run as part of your build pipeline so you always know the state of your current release candidate. Also remember that it takes time to get it right. But following our suggestions will give you a head start.
Explore related blog posts
Lean Startup Methodology: 5 Lessons I’ve Learned In 5 Years
11 Essential Steps to Build in Website Performance
How to Design for Failure AND Success: 7 Key Steps We Take
Written by: Frederik Williams, Queue-it Software Developer
(This post has been updated since it was originally written in 2017.)